Showing posts with label Tips & Tricks. Show all posts

Friday, December 20, 2013

Tips & Tricks Friday - Sneaky Ribbon Tying

Ribbon tying is not one of my strong points.  In fact before learning this trick I really didn't use ribbon on my cards at all.  I couldn't seem to get my fingers working in the right directions to get the tight and pretty bows with all the ends going the right way.


Now I use ribbon for everything.  Here is yesterday's ribbon project - a quick and easy decoration for a Christmas present.

To tie the ribbon on the box I made a belly band from the 1" Cherry Cobbler Stitched Edge Grosgrain ribbon and tied the three pieces of coordinating all at the same time as shown in the video.

I filmed this video in 2010 so some of the products in the video are well and truly retired but the basic concept is still the same.

If you can't see the embedded video in this post click on this link - blogger seems to be playing up this morning.


Friday, December 06, 2013

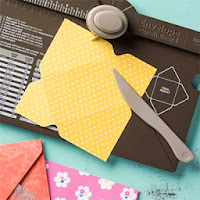
Tips & Tricks - Envelope Liners using the Envelope Punch Board

I love the envelope punch board and have spent a lot of time with it making boxes, bows, crackers, tags, shaped cards and yes even envelopes.  Even better I've now found on the web a way to line my envelopes.


First using the instructions included on the envelope punch board I made an envelope to fit a 10.5x14.8cm card, stopping before I stuck it all together.


Next I made a slightly smaller envelope to fit a 10.2x14cm card out of the Modern Medley Designer Series Paper that I'd chosen for my liner.


Because not all of the liner is visible I trimmed the smaller envelope as shown in the photo to avoid extra bulk when putting the envelope together.  Adhere the liner to the envelope as shown in the photo.


Complete your envelope and it looks like this. 


http://www3.stampinup.com/ECWeb/ProductDetails.aspx?dbwsdemoid=4000827&productID=133774


Click on the photo for more information on the Envelope Punch Board.


Friday, November 29, 2013

Tips & Tricks Friday - Covering an Entire Image in Glitter

There are various ways to add glitter to a stamped image.  If you want to highlight the image a 2 way glue pen is fabulous, if you want just the stamped part of the image to be glittered use Heat & Stick embossing powder but if you want to cover to entire area then this is what I do.


Stamp your chosen image in any ink you choose, although make sure it's dry before you go to the next step.

Cut a piece of 'Multipurpose adhesive sheet slightly larger than your image, peel back one side of the backing paper and adhere it over your image.  Run your bone folder or fingers over the adhesive sheet to make sure it's well stuck.

Cut out the image using scissors, a matching punch, a matching framelit, whatever works for you.


Remove the remaining backing paper, sprinkle with glitter and add to your project.

Multi Purpose Adhesive Sheets

Dazzling Diamonds Glitter

Click on the links above or Email me to purchase the adhesive sheets and glitter that I used in this tutorial.


Friday, November 08, 2013

Tips & Tricks Friday - Washi Tape Pegs

I'm very fortunate in my Stampin' Up!® world to be surrounded by talented paper crafters.  One of those ladies is Kirsty (StampIN-K).  She graciously shared her Washi Tape pegs with the team at our latest team gathering.

This is the way I've found that works best for me to get the Washi Tape to stick nicely to the peg.

I didn't find it easy using the Washi Tape while it was still attached to the roll.  Yes I used less tape but I found it fiddly so....


I ripped off a slightly longer piece than necessary and laid it flat, sticky side up.  the peg gets placed on to the tape matching one side up perfectly.  N.B. Putting the side with the wire against the edge of the washi tape now makes cutting along the edges easier in the next step.


Using your paper snips trim the tape along the other three edges.


Decorate as you please.  I use Sticky Strip to adhere my embellishment to the peg and placed so it hid the wire.

I used one of the patterns from the Epic Day Washi Tape pack for this tutorial. 

Other Washi Tape    
 - Gingham Garden
 - Season of Style

I bought my pegs from a local bargain shop.  I did have to pick through them to find the nicest ones to use.  No waste though, the others went out to the washing line.


Click on the links above or Email me to order Washi Tape & any other products on your wishlist.

Don't forget to use November's Hostess Code with your online order - GASRUJGH - to be in to win the hostess benefits.

How does the hostess code work?


Friday, November 01, 2013

Tips & Tricks Friday - File Folder Card using the Envelope Punch Board


This card could be landscape or portrait, it could have one side shorter than the other, it could be a journalling pocket or a gift card pocket.  Once you've got the basics below sorted I'm sure you'll find all sorts of ways to use this technique.

Start with a standard folded A5 card base.


Insert the corner of your card base into the punch board as shown & punch.  The edge should be up against the inside edge of the score guide.


Move the punched edge along to the 3" mark and punch again.


Align the punched edge in the paper trimmer as shown with the groove along the bottom of the punched shape.  Trim to remove the card to the top of the punched shape.

Flip your card and repeat on the opposite side.

Finish your card as you choose.

I used: -
 - Teeny Tiny Sentiments Stamp Set - 130042 (wood), 120024 (clear)
 - Gorgeous Grunge Stamp Set - 130514 (wood), 130517 (clear)
 - Smokey Slate Cardstock - 131291
 - Midnight Muse Cardstock - 127546
 - Whisper White Cardstock - 106549
 - Smokey Slate Classic Stampin' Pad - 131179
 - Midnight Muse Classic Stampin' Pad - 126860
 - Envelope Punch Board - 133774
 - Word Window Punch - 119857
 - Stamping Sponges - 101610
 - Basic Grey Stitched Grosgrain Ribbon - 126879


Click on the Shop 24/7 button below or Email me to order the product used in this week's tutorial.

Don't forget to use November's Hostess Code with your online order - GASRUJGH - to be in to win the hostess benefits.

How does the hostess code work?


Friday, October 25, 2013

Tips & Tricks Friday - Using Candy Dots to Hide an Inky Oops on your Card

Gorgeous Grunge is one of the stamp sets available at 25% off until Monday (28th October).  I used it to make this card to showcase on my facebook page yesterday.


I was very pleased with it in traditional Christmas colours but I didn't have enough candy dots to be able to use it as a workshop card so I designed one in blue and silver.


You might have noticed that apart from the change in colours I've added some basic rhinestone jewels and three more candy dots under the greeting.  I like it but it wasn't meant to be that way.  Look at the photo below and you'll see that the first candy dot is covering an ink smudge. 


My first reaction was that the card was ruined and that I needed to start again, what a waste.  I'm glad I waited a few minutes because with the extra embellishments I think the card looks better the way it is now.

It doesn't only work with candy dots, depending on the position of your inky smudge you can sponge, use ribbon, rhinestones, pearls, buttons, punched shapes etc, etc to hide mistakes and often create a masterpiece in the process.


Click on the photo to see which stamp sets, including Gorgeous Grunge, are on offer at 25% off.

Don't forget to use October's Hostess Code with your online order - JFN6QNHN - to be in to win the hostess benefits.


Friday, October 11, 2013

Tips & Tricks Friday - Alternate Use for the Full Heart Punch

Yesterday I posted on update on my facebook business page asking if they liked a card made with designer series paper strips and washi tape.  (See below).  
After reading the comments and discussing the cards with my stamp club ladies last night I realised that it wasn't so much the type strip used but the way the ends were handled.


On the card using the designer series paper strips I created flag ends using my scissors.  You can also get this shape using the corner of a square punch.


While it's a little more fiddly getting the strip lined up in the heart punch,


I really like the slight curve that it gives the flag end.


Try out other punches that you have on hand and find by using them as normal or upside down other ways of decorating the ends of strips of paper or card.

Full Heart Punch


Click on the link above to purchase the Full Heart Punch and your other product choices through my Online Store.  

Add October's Hostess Code - JFN6QNHN - to your online order and be in to win the hostess benefits.


Wednesday, October 02, 2013

Christmas Card Wednesday

 This card is dedicated to Fiona, Gillian, Madeleine, Zoe & Ruth who worked with me this morning during our Craft at Keryn's session to find the best way to get a clean image from this gorgeous Christmas Star stamp.


The original idea for this card came from this gorgeous card I found posted on Pinterest this morning.

Large stamps, particularly solid ones are always trickier to stamp with.  After some trial & error these are the two things that made the most impact when trying to get a complete image and one without extra ink around the edges.

1. An absolutely solid surface with no movement.  I found the desk in my office to be the best option, better than the trestle tables in my class space.  I topped my desk with a craft mat.

2.  The wetter the ink pad is the better.  The new firm foam classic ink pads were much better than the older felt pads.  You always get a more solid image with the firm felt pads anyway and being able to gently ink the stamp rather than twisting and tapping meant no ink on the edges of the rubber.  Having more ink on the stamp meant you didn't need to press as hard when stamping so less risk of any ink on the edges of the rubber transferring.

The only thing I need to master now is some patience.  The wetter the ink the longer it takes to dry and the more likely it is that I'm going to put finger prints into clean white space.  Sponging is absolutely my best friend.


Click on the link above to purchase any of the best of the Single Christmas Clear Mount Stamps and your other choices through my Online Store.  If online ordering isn't your thing Email me to place your order.
  
Add October's Hostess Code - JFN6QNHN - to your online order and be in to win the hostess benefits.


Friday, September 27, 2013

Tips & Tricks Friday - Save your Paper Trimmer Blade

I love my Stampin' Trimmer - definitely a trimmer that was designed with some input from the paper crafters.  Even better the Rotary Addition is now available to make your Stampin' Trimmer into a Rotary cutter as well.


When you cut with your paper trimmer how many of you cut mostly in one direction?  I know I do - mostly from the top down.  I hadn't thought much about it until my team member Jayne Mallin posted this on her Papillon Papercrafts facebook page yesterday. 


"TIP OF THE DAY: When using your Stampin' Up (c) Timmer remember to use the blade in both directions (up and down cutting) over time - otherwise one side of the blade will dull while the other side is still new!"

 
Paper Trimmer & Accessories


Click on the link above for the paper trimmer & it's accessories and purchase those and your other choices through my Online Store.  


Add September's Hostess Code - GT2RD7C2 - to your online order and be in to win the hostess benefits.


Friday, August 30, 2013

Tips & Tricks - Stamp Sets may be more than they seem.


This 'Wishing You' stamp set comes with Christmas greetings in a Holiday Catalogue filled with Christmas samples so it can only be a Christmas set, right?  


Done in Christmas colours, with Christmas themed designer series paper (Season of Style) it makes a pretty good Christmas card.


Well that's what I thought until I saw Jenny Hayward's Post in the ESAD 'Holiday Catalogue' Blog Hop.  Thanks so much for the wake up Jenny!


Now using a greeting from the 'Happy Day' stamp set, 'Birthday Basics' designer series paper and the matching colours, 'Wishing You' is also a Birthday set & a Wedding Set, an Anniversary Set, well a set for anytime you give a present.


Wishing You Stamp Set - wood mount

Wishing you Stamp Set - clear mount


Friday, August 23, 2013

Tips & Tricks Friday - Sharp Creases

There are lots of different ways used by card makers to get a sharp crease in their card bases.  I prefer this very simple method that just uses one very inexpensive tool.


To start I fold my card base in half lining up the corners and crease the fold line with my fingers.  As you can see from the photo it's not a very sharp fold and it's very difficult to work with a surface that isn't flat.


Next I grab my bone folder and run the edge along the fold.


This is the nice flat surface I now have to work with.  It also makes sure that your finished card stands nicely once it's been received by your recipient.

Bone folders are also great for running down the track in a paper trimmer to create a score line, burnishing punched/die cut shapes to create dimension and sharpening creases in 3d items such as boxes.

You can Email me to place an order for a bone folder 102300 $14.25 or click on the Shop 24/7 button below to place your order.


Friday, August 16, 2013

Tips & Tricks Friday - Stampin' Dimensionals

There are just so many uses for foam tape/stampin' dimensionals: - 

 - popping up stamped images to give a 3D look
 - sticking down flat cardstock over a textured area and visa versa to make sure it sticks properly
 - giving some lift so flat cardstock isn't buckled by the legs of brads and other bulky embellishments

the list goes on and on and I'm sure there are other uses you can think of.

The big advantage to me of Stampin' Dimensionals over foam tape is that you don't have to cut them to size with scissors and then end up with sticky scissors.  (We've all been there!)

There can however be one small annoyance with Stampin' Dimensionals.  Sometimes it's really hard to get the backing off.  This is how I solve it.


Card all ready to be assembled.

 Stampin' Dimensional placed on the back of the stamped flower.


But before I try to remove the backing I make a dent in the centre of it with a finger nail, the sides pop up and it comes off so easily.


Finished card.

Get your Stampin' Dimensionals from my Online Store or Email me to place your order.